Last weekend I put several posts up about my ‘home spa’ treatments and I was delighted at how many of you were inspired to do a home facial after reading my posts. So, in light of that, I decided to give you a bit more detail on how to carry out a home facial so your skin feels super clean and luxuriously soft.
During this time of restrictions due to Covid there is no need to make a special trip out to get products for this, they can be bought during your weekly shop to the supermarket where there is lots of choice now, or online.
So, take some time out for YOU, enjoy the process of your home facial, and the results, and let me know how you get on.
GETTING STARTED
THE PRODUCTS
First of all you want to decide on what products you are going to use for your home facial and get them ready. Below are the products I like to use but you can obviously leave some of these out or add others in. Do you have sample products laying around that you have kept hold of, or products that you may have been given and just not got around to using, then now is their time to shine.

SELF PREPARATION
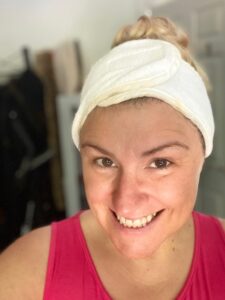
It is a good idea to make sure your hair is away from your face, tied back and with a hairband on is best. In fact I tend to do my home facial on a day that my hair is ready for a wash so if I get products on it then it’s not a problem. I like to put a small towel around my shoulders, secured at the back with a hair clip or peg, so that I can use it easily to pat my face or wipe my hands.


STEP 1 – Cleanser
 Before you do anything else to you skin you must make sure it is super clean. There’s no point in using masks and other products if you haven’t cleansed your skin first. You may prefer to use a cream cleanser that you apply and massage in and then remove with cotton wool or a flannel, or a foaming cleanser that you rinse off with water. Whichever you decide to use I recommend you double cleanse to ensure that all traces of make-up and natural debris are removed and your skin is ready for the next step. If you have a face brush or similar it’s a great idea to use it at this stage.
Product I used: Ren Evercalm Gentle Cleansing Gel
STEP 2 – Face Scrub
Using a gentle face scrub on damp skin massage it over your face and neck in a circular motion to slough away any dead skin cells, rinse the product off and then pat your face and neck dry with a towel.
Product I used: Ren Gentle Exfoliating Cleanser
STEP 3 – Deep Pore Cleansing Mask
For this step I like to use a charcoal mask or similar. Charcoal helps in removing dirt from the pores and gives your skin a thorough cleansing. These masks also control the oil secretion in your skin, making it perfect for skin prone to blackheads and acne. I have a sensitive skin so I’m careful not to choose one that is too harsh. This can be a messy process if not done carefully and I would recommend either applying the mask with a clean brush or using just one hand, keeping the other one clean, that way it’s easier to turn the tap on to wash off your other hand!! When the mask goes on it will feel cold and wet but as it dries it will feel tighter and dry. Most of these are removed by washing off but always read the instructions first.


Product I used: Mary Kay Clearproof Deep Cleansing Mask
STEP 4 – Moisturising Face Mask
Once the skin is fully cleansed and all product is removed then I like to use a moisturising face mask. My preference is the sheet kind, they can be a bit fiddly when you first use them but you will seen get used to them. There will be an excess of the moisturising product and I recommend you don’t waste this but massage it into your neck and décolletage area (top of your chest).
Once the mask is on put on some music or do some meditation and enjoy 15-20 minutes of total relaxation and let the mask do its thing! Once time is up then remove the sheet and take a few minutes to massage the remaining product into your face and neck. I find that most masks leave a slightly sticky residue and I like to blot that off with a damp cloth, but you can leave it on if you wish.


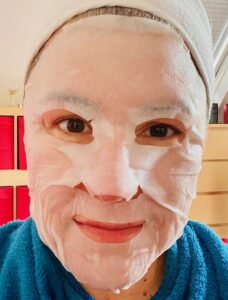
Product I used: Garnier Moisture Bomb
STEP 5 – Hydrating Eye Cream
 The area around the eye has less layers of skin than the rest of the body which is why it’s a good idea to use a cream specifically designed for the eye area. I particularly like the ones with a roller ball that is cooling and hydrating such as the Clinique all about eyes serum. Apply the eye product circling the outer eye area and either pat it in or very gently massage it in.
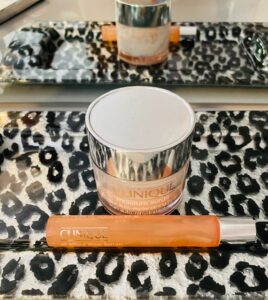
Product I used: Clinique All About Eyes Serum
STEP 6 – Hydrating Moisturiser
My last step is to use a hydrating moisturiser. The reason I use a hydrating one rather than a rich moisturiser is that I feel it can just be too intense on my sensitive skin after all the other products I’ve used. If you have a very dry skin then you may wish to use a rich moisturiser instead. I love the Clinique Moisture Surge from the same range as the Eye product mentioned above. I actually discovered these when I bought them on a plane and have loved them ever since.
Product I used: Clinique Moisture Surge
JOB DONE!!!!
You should now have super clean, beautifully moisturised soft feeling skin. A sense of calm and a feeling that you have done something really fabulous for yourself. Your skin will definitely thank you for your kindness to it by staying healthy and hydrated.
TOP TIPS FOR YOUR HOME FACIAL
- Use upward strokes when massaging your face and neck.
- Wait for one product to be absorbed before using another product.
- The best thing you can do for your skin is to hydrate it so remember to drink plenty of water during and after your home facial.
You may have your own way of carrying out your home facial and different products such as oils and serums and that is fantastic. Just set some time aside, get yourself ready and enjoy the process.
To find out my daily skincare routines check out my YouTube channel @abfabimage which gives you detailed videos.

